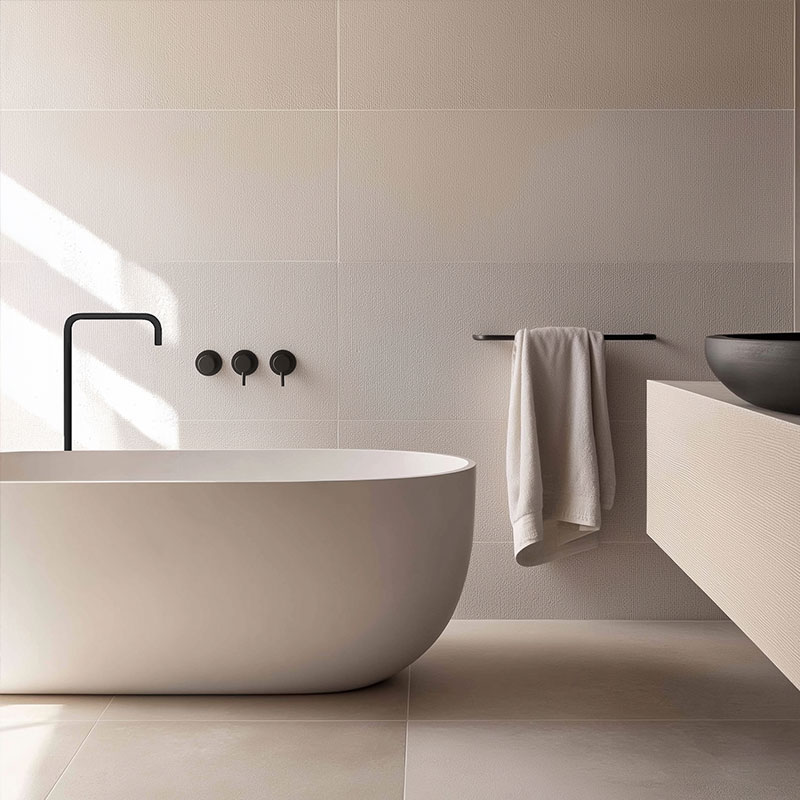
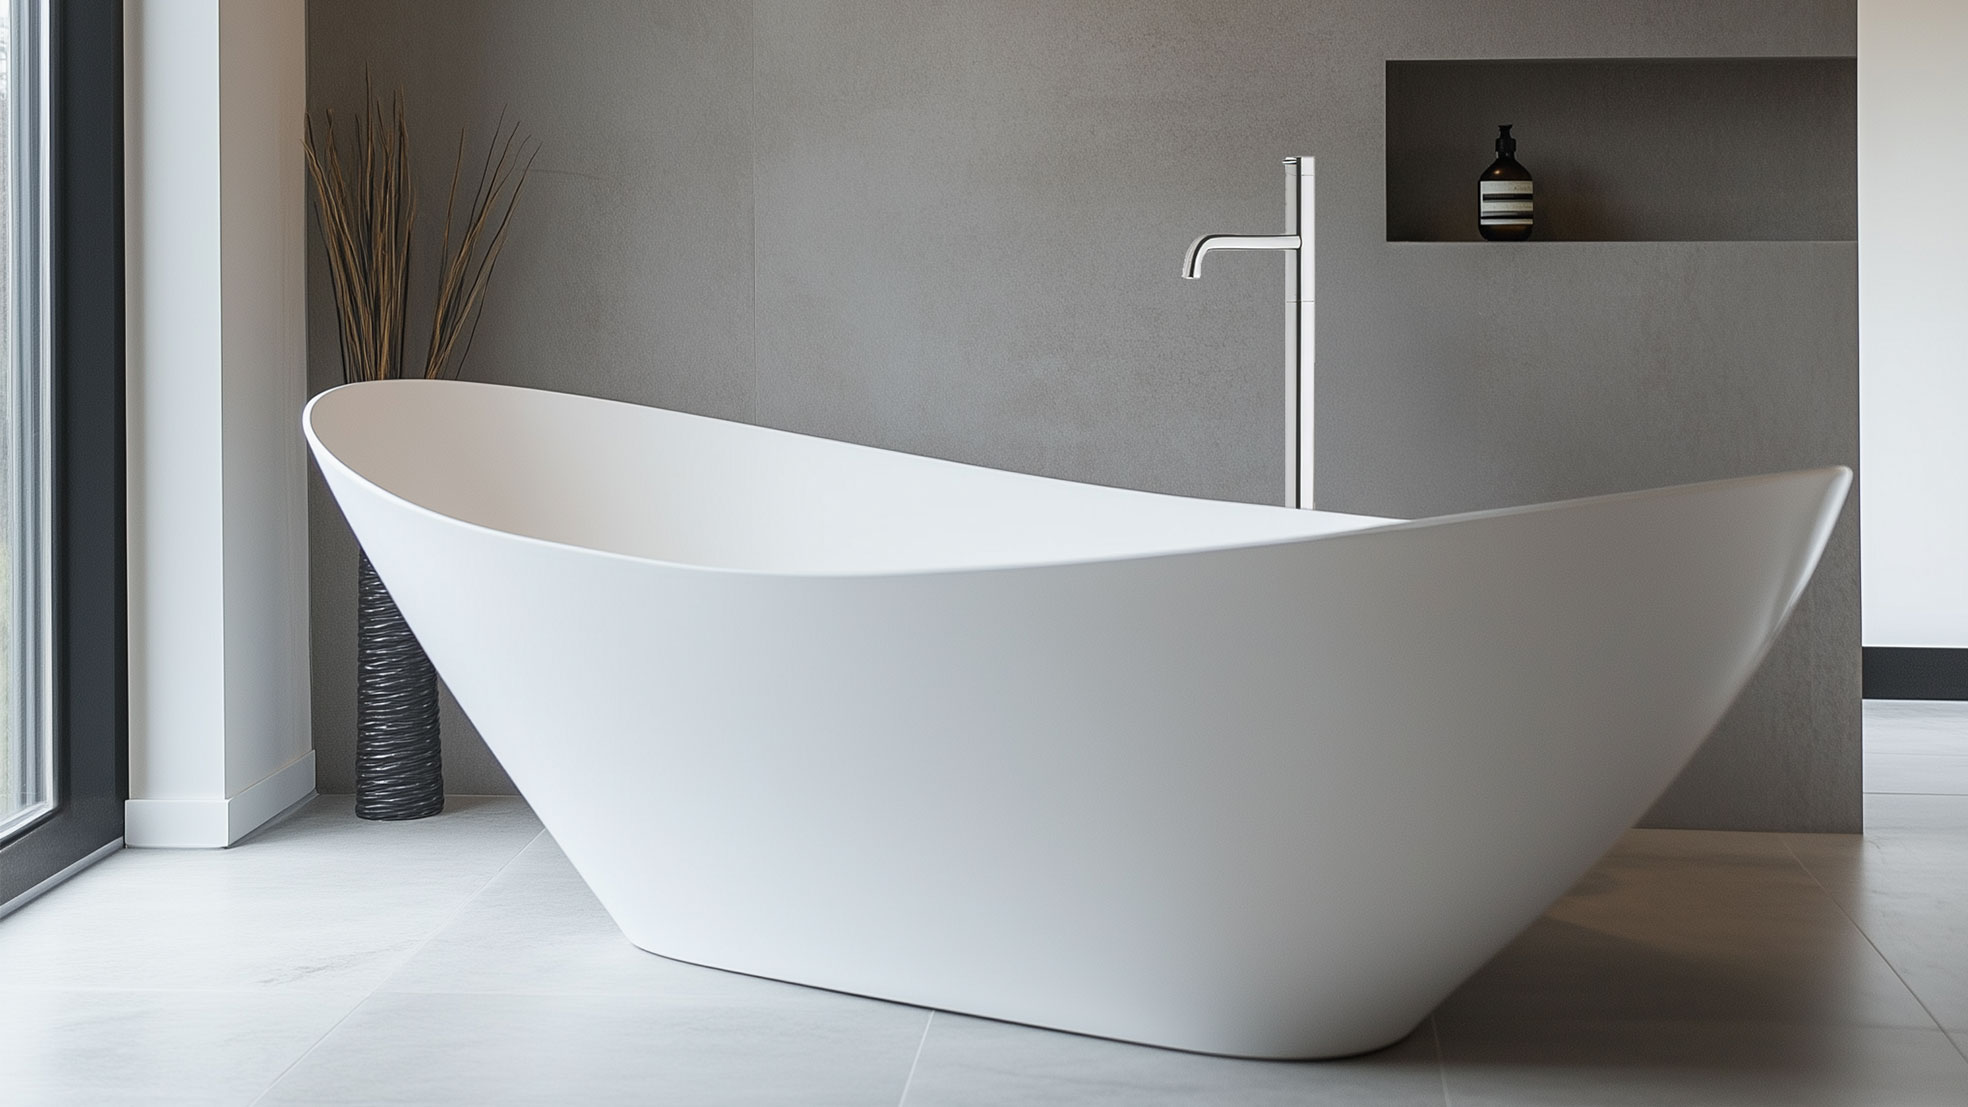
Few bathroom fixtures make a statement quite like a floor-standing bath mixer. Rising elegantly beside a freestanding tub, the vertical column frames the bath like sculpture. Clean lines, negative space, a sense of calm symmetry. With pipework hidden beneath the floor, the eye perceives only shape and proportion. It's no wonder these mixers appear in every spa-style retreat and hotel bathroom worth photographing.
But that effortless look requires effort behind the scenes. Floor-standing mixers demand more planning than wall-mounted or deck-mounted alternatives. Get the details right, and you'll have a bathroom centrepiece that performs as beautifully as it looks. Rush the preparation, and you'll face compromises that are difficult, sometimes impossible, to fix later.
These fixtures shine in specific contexts. They're ideal when you have a freestanding tub with breathing space around it, when you're creating a minimalist or organic aesthetic, or when practical constraints make wall-mounting difficult. Glazed walls, stone cladding, or simply too much distance to run pipework neatly can all make floor-standing the smarter choice.
If your bathroom ticks those boxes, a floor-standing mixer might be exactly what your design needs. If you're working with a tight space or a built-in tub, other mounting options will likely serve you better.
Before choosing a specific mixer, you need to understand the geometry of your installation.
Spout positioning is critical. Aim for 90–150mm between the spout outlet and the tub's inner rim. Close enough for water to land cleanly inside, far enough to avoid splashback. Spout height typically falls between 800–1050mm above the finished floor, but this depends on your tub's rim height. A spout that works perfectly with a low-profile soaking tub may be completely wrong for a tall Japanese-style bath.
Column placement requires similar precision. Position the column 120–200mm from the tub's outer wall. Too close and you risk the column touching the bath; too far and reaching the controls becomes awkward. The goal is comfortable hand access without physical interference.
Orientation matters more than people expect. Controls should face the bather or the approach path, never the wall. Nobody wants to lean across water to adjust the temperature. Similarly, the hand shower should be reachable while seated in the tub, with a hose length of 1.5–1.75m to prevent uncomfortable tugging.
A floor-standing mixer is only as good as the base beneath it. This is where installations succeed or fail, and it all happens before the finished floor goes down.
Substrate assessment comes first. Whether you're working with a concrete slab or timber joists, verify that the structure can accept the required fixings. If you have underfloor heating, map the heat loops carefully before drilling anything. Puncturing a heating pipe is an expensive mistake. Some manufacturers recommend thermal breaks in specific locations; follow their guidance.
Anchoring and stability require precision. Most mixers use a floor mounting plate or rough-in box that's fixed mechanically to the substrate before finished flooring is installed. Use the manufacturer's template exactly as provided. Even micro-misalignments become visible once the column is installed. A slight lean, a gap around the flange, a base that doesn't sit quite flush. These details are obvious in a minimalist bathroom where clean lines are the entire point.
Water supply and isolation need forethought. Bring hot and cold tails up through the mounting kit, keeping the vertical rise perfectly plumb. Tight bends create restriction and can cause whistling sounds during use. Most importantly, install serviceable isolation valves below the cover plate. This single step makes future maintenance dramatically easier. Without isolation valves, a simple cartridge swap requires draining the entire system.
Waterproofing and acoustics complete the rough-in. Apply your waterproofing membrane right up to the penetrations and seal with appropriate grommets or escutcheons. In apartments, acoustic underlay may be required to dampen flow noise and meet building regulations. Check local requirements before finishing the floor.
Water pressure determines whether your mixer will perform satisfyingly or frustratingly.
Many floor-standing mixers with hand showers need a minimum of 1.0–1.5 bar for adequate flow. Thermostatic columns often perform best when hot and cold pressures are balanced. Test pressure at the bathroom itself, not at the building entry. Pressure can drop significantly through the system, especially on upper floors or at the end of long pipe runs.
Cartridge choice depends on household needs. Ceramic disc cartridges offer smooth action and excellent durability for single-lever designs. Thermostatic cartridges maintain stable temperature and provide anti-scald protection. They're recommended for households with children or where supply temperatures fluctuate. Look for removable, scale-resistant aerators as well. In hard-water regions, being able to easily clean or replace the aerator saves significant maintenance headaches over time.
The finish you choose affects both aesthetics and long-term durability.
Stainless steel (AISI 304 or 316) offers excellent corrosion resistance, hygienic properties, and long service life. It's particularly well-suited to coastal locations or consistently humid bathroom environments.
Brass with PVD coating delivers the widest range of colour options. Brushed gold, copper, graphite, matte black. PVD provides superior scratch resistance and colour retention compared to traditional electroplating. These finishes hold up remarkably well over years of daily use.
Chrome remains the classic choice, offering a mirror-like shine that suits almost any design direction. The trade-off is visibility: water spots and fingerprints show more readily, so plan for regular wipe-downs if you want that showroom gleam.
Whatever finish you select, consider how it relates to other fixtures in the room. Matching your mixer to your shower set, towel bars, and mirror frames creates visual continuity. Alternatively, a deliberate contrast (brushed gold against honed travertine, for instance) can create a curated, intentional look.
Not every floor-standing mixer works with every freestanding tub. Several factors need to align.
Rim height matters for spout selection. Tall tubs with 580–620mm rims pair best with higher-rise spouts. Verify that the spout reach clears both the tub's outer wall and inner lip. Templates and on-site testing with the actual tub are invaluable here.
Fill rate becomes relevant for large-volume tubs. A high-capacity soaking tub paired with a low-flow mixer means long waits. Check the litres-per-minute specification at 3 bar on the product data sheet and compare it to your tub's volume.
Tub stability is occasionally overlooked. Lightweight acrylic tubs can shift slightly on uneven floors. The mixer base shouldn't become a de-facto brace holding the tub in position. Ensure the tub is independently stable before installation.
Late plumbing decisions cause the most problems. Trying to add a floor-standing column after tile is already set forces compromises or visible patching. Plan mixer placement at the slab or joist stage, not as an afterthought.
Guessing at placement leads to daily frustrations. Eyeballing the offset often results in awkward hand shower reach or a spout that splashes the rim instead of filling the tub cleanly. Use manufacturer templates and test with the actual tub on site whenever possible.
Ignoring serviceability creates future headaches. Skipping isolation valves means draining the entire water system for simple cartridge swaps. A minor oversight that causes major inconvenience years later.
Under-specifying finish quality shows over time. Cheap coatings can fade, chip, or corrode. PVD or stainless steel costs more upfront but pays back through years of maintained appearance.
Mismatched pressure undermines thermostatic performance. When hot and cold supply pressures differ significantly, thermostatic valves struggle to maintain stable temperature. Balance the system before finalising the installation.
Always follow the manufacturer's instructions and local regulations, and use a licensed installer for the work. The general sequence runs as follows: position the tub and mark the mixer offset from its centreline, then fix the mounting box to the structural substrate with careful attention to plumb and level. Bring hot and cold supplies through the box with isolation valves, pressure test the system, and waterproof around all penetrations before laying the finished floor.
Once the floor is complete, set the column over the mounts and torque fasteners to specification, checking vertical alignment as you go. Connect the cartridge and hoses, fit the spout, hand shower, and escutcheon, then flow-test thoroughly and check every joint for leaks. Some designs require a discreet sealant at the base; others rely purely on mechanical flanges. Follow the manufacturer's guidance.
Floor-standing mixers are straightforward to maintain with consistent habits.
Wipe the column and fixtures after use with a soft cloth to prevent water spot buildup. This is especially important for chrome finishes. Avoid abrasive cleaners or scouring pads, which can damage coatings over time. For limescale in hard-water areas, use a mild pH-neutral cleaner and rinse thoroughly. Soak the aerator periodically in a 50/50 vinegar solution to clear mineral buildup, unless your finish manufacturer advises otherwise. Inspect hose washers annually. If you notice weeping at any joints, replacement washers are inexpensive and simple to fit. Addressing small leaks early prevents larger problems later.
Can I install a floor-standing mixer in a small bathroom?
Yes, provided you maintain proper clearances. Choose a compact column design and a tub with a slimmer profile. Ensure you can move around the tub comfortably without catching the hose or bumping the column.
Do I need thermostatic control?
It's not mandatory, but it's recommended for households with children or where supply temperatures fluctuate. Thermostatic valves stabilise the water mix and add anti-scald protection.
What if I have underfloor heating?
Map your heating loops before any drilling and follow the manufacturer's thermal guidance. Where hot water supplies pass near heating runs, add sleeves or insulation to prevent unwanted heat transfer.
How do I know if my water pressure is sufficient?
Ask your installer to test both static and dynamic pressure at the bathroom location. Most floor-standing columns perform best between 1.0–3.0 bar. Check your chosen model's data sheet for specific requirements.
Which finish lasts longest?
PVD coatings on brass and solid stainless steel offer the best longevity and scratch resistance, particularly in humid or coastal environments.
But that elegance depends on preparation. Plan early, get the rough-in right, choose quality materials, and your mixer will reward you with years of flawless performance. Cut corners, and you'll see the consequences every time you step into the bathroom.
Take the time to do it properly. The result is worth it.